Category: Blog

How to repair damaged drywall around a window

Drywall is commonly used for interior walls in houses and buildings. Installation is easy, the material can be textured in many ways, and is a solid surface for both wallpaper and paint. The only problem is that drywall easily attains scratches, holes, water damage and other dings.

If a piece of drywall around a window — or anywhere on a wall, for that matter — needs repair, the most effective method is to cut out and replace the drywall that has been damaged. If the damage done is only a tiny hole, that can be spackled.

10 steps for best results

Follow our guide to repair your drywall:

  1. First, loosen and remove the damaged drywall from around the window that needs to be fixed. Knock out a small piece of drywall to make a tiny hole in the area that has been damaged.
  2. Second, put a keyhole saw blade into the hole. Make back-and-forth cuts that are shallow and to the right until you connect with the stud on the right side of the hole. Be careful not to cut into the stud. Do this to the left of the hole as well until you hit the stud on that side.
  3. Third, take the keyhole saw out of the wall. Move the blade’s teeth so they point down to the floor. Position the saw perpendicular to the wall at the cut’s left end. Hit the handle’s end with your hand to insert the saw into the drywall. Saw down through the drywall by the edge of the stud until you have moved beyond the area of damage by about five inches. Move back to the horizontal line and then cut up until clearing the damage by approximately five inches. Also complete this step by the right-side stud, equaling the length of the cut above and below the horizontal line.
  4. Fourth, make a cut straight across the top of the damaged area starting at the top of the left cut and moving to the top of the right cut. Remove the now loose drywall piece. Move to the bottom of the damaged area and cut across between the lower end of the two vertical cuts. Remove the last piece of material that is damaged. You should be left with an opening that is rectangular and with four square corners. Using the keyhole saw, clean out the cuts that aren’t straight and square up the corners.
  5. Fifth, use a measuring tape to determine the distance between the exposed studs. Cut two pieces of one-by-two lumber to that exact length. Place one of the boards horizontally flat along the inside, bottom edge of the opening. Now, half the width of the board should be behind the drywall while the other half protrudes up inside the opening. Place a screw every four to six inches through the drywall to secure the board to the drywall just under the bottom of the hole. Do this again at the top of the hole with a second board.
  6. Sixth, get you tape measure back out to find the distance between the boards. Trim two more pieces of one-by-two lumber to this length. Place one of the boards flat against the stud to the hole’s left. Ensure that the front edge of the board is even with the stud’s front. Screw it to the stud at every six to eight inches with 2-inch wooded screws. In the same exact way, attach another one-by-two board to the stud’s right side.
  7. Seventh, measure the height and width of the drywall opening. With a drywall saw, trim a new piece of drywall to match the dimensions. Place the fresh piece of drywall into the opening tightly against the boards you installed in earlier steps. Using a drywall screw every four inches or so around the outside, attach the drywall to the four boards.
  8. Eight, use a coat of joint compound in the areas surrounding the drywall patch. Trim and position joint tape over each joint. Paint on another layer of joint compound. Allow the compound to dry for 24-30 hours. Sand it lightly until it is smooth.
  9. Ninth, add on one more layer of joint compound approximately four inches wider than the first sanded layer. When the layer dries, sand it and apply a third layer of compound and one last sanding.
  10. Finally, when the drywall patch around the window is finished, apply the same type of texture on the wall to the patch and areas surrounding. Give the texture time to completely dry. Add two coats of primer, then paint with the same color already on the wall. If needed, put on a second coat.

If you don’t feel comfortable make the repair on your own, call upon the assistance of your local drywall contractors in Erie, PA.

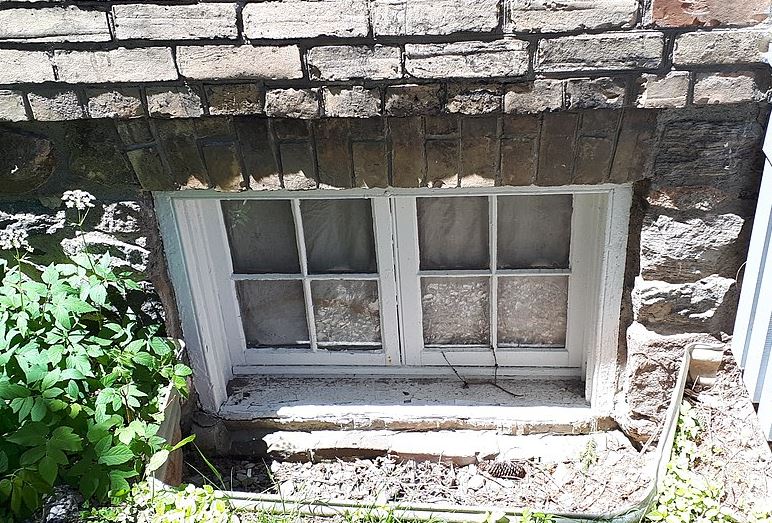
What Causes Basement Windows to Leak and How to Fix Them

basement window repair

Are your basement windows leaky?

Thanks to basement windows, your basement gets its much needed dose of natural daylight. When there is no power, even a tiny hopper window can give enough light to help you locate the litter box, photo albums, or circuit breaker. Having functional and clean windows is always safer and brighter.

Sadly, your basement windows can get dark, dirty, and rusty over time. Once this happens, your basement windows lose their purpose. The worse thing about weakening basement windows is that they can leak, allowing chilly air inside during cold months.

What causes basement windows to leak and how do you fix them?

Decayed and Rotten Windows

If you notice water seeping through the edges or corners of the basement window, obviously, the windows themselves are the problem here. Steel and wood basement windows tend to rot and decay over time and this can lead to water intrusion.

To solve this issue, consider replacing your outdated basement windows with something more resistant to water. There are now waterproof basement windows with seals that don’t decay right away when it gets into contact with the different elements. Once installed properly, these windows can also stop air leaks, improving the energy efficiency of your basement.

Uncovered or Old Window Well

Old-fashioned window wells used to be made to allow the highest amount of daylight to enter basements. If left uncovered, these wells will quickly fill up with leaves, debris, and dirt. Melting water, rainfall, and water from the ground can accumulate in these wells, finding their way into your basement.

Fix this issue by covering your window wells with weatherproof covers. Look for window wells that won’t decay once they get in contact with the elements and wet dirt. You can also use a clear cover that can keep the water and debris out while still allowing light to stream into your basement. There are covers with bright reflective surface designed for bouncing sunlight to the basement. This cover can also serve as a buffer against cold winds during winter, thus making the basement much more energy efficient as a result.

Improper Drainage

Don’t forget that your basement is not a submarine. You cannot completely seal off all the water, particularly when your foundation is surrounded by improper drainage and poorly graded yard. Good thing there are several steps you can take that can help relieve hydrostatic pressure that can naturally occur from water in surrounding soils.

  • Always keep the gutters clean and in proper working condition. If you don’t have them yet, it is time to install them right away.
  • See to it that the terrain has been properly graded and will slope away from your home’s foundation.
  • Make sure that water is indeed coming in through the windows and not another spot in the foundation that would require basement crack repairs.
  • Prevent the downspouts from pouring the water near the foundation walls. Try to extend them as far as you can away from your house.
  • Check that the foundation drainage is still in great condition. An internal perimeter drainage is recommended and combine this with a quality sump pump.

For expert installation of new basement windows contact foundation repairs service in Canton, Ohio.

Auto Glass Self-Installation Guide

Self-installation can be an excellent way to save money while adding value to your property, and it’s surprisingly easy as long as you go about it in the right way. Whether you’re an experienced contractor professional or just someone who enjoys taking on projects involving your own home (beginner).

Tips on doing Glass Installation at Home

1: measure the piece of glass you need and know the make, model, and year of your vehicle so that you purchase the correct replacement part.

2: If the rear view mirror is still in place on the old piece of windshield remove it at this time.

3: Remove the existing glass. Remove the old gasket that was holding the glass in place at this stage.

4: Carefully clean the area where the new glass is going to be installed. Clean the surface with a non-oily
cleaner to remove any old adhesive or gasket material.

5: With the help of a friend place the new gasket in position on the automobile.

6: Carefully place the piece of glass into the new gasket you have installed. Some gaskets are designed to be put on the glass before
installation, and some of them go on the car first. Follow manufacturer’s instructions to make certain you are placing the gasket on the proper part first.

7: Use the recommended adhesive to secure the new glass in place. Go all of the way around the windshield applying adhesive to form a strong water proof barrier.

8: After the adhesive has the proper amount of healing time use a sharp knife or razor blade to carefully remove any excess adhesive or caulking from around the windshield.

9: Install the rear view mirror on the interior of the car using approved adhesives.

In conclusion, be sure and dispose of the old window and gasket
material safely. It is best if you package this debris in a cardboard container
before you set it out for the garbage collectors to pick up.